Showing posts with label baking. Show all posts

Sunday, 2 February 2014

Worry | Summer Fruit Millefeuille

[Note: This post was written at the beginning of January, however my brand new, shiny laptop broke down on me! Gah! Maybe I should be banned for technology. Anyway, if this post seems slightly irrelevant my apologies.] 

Positivity once came very easily to me, but now I find myself becoming more and more of a pessimist every day. And that bothers me. I was once described as one of the most laid back people, now I find myself in the alien situation of becoming one of the most high strung ones.

I have always been a worrier. Always. Infact I was once gifted these tiny little wooden people, all beautifully painted, that were called 'worry friends'. You were supposed to tell them all your worries before you went to sleep and they would magically help your worries disappear overnight. This worked for a very brief time until I lost them in a caravan in Wales, which is worrying in itself.

My new years resolution is to focus on the positive and to stop stressing so much. A task that might take a small army, but nethertheless that is my goal. Focusing on the positives also means, to me at least, looking back on the past. In this case looking back to the glorious summer we had last year. I'll admit I spent the majority of it wishing that I could move to Alaska to get out of the dreadful heat, but I did secretly enjoy it.

During the summer my sister hosted a BBQ party and for dessert she served the most beautiful Eton Mess, I plan on stealing the recipe away from her soon. The fruit was cloyingly sweet last summer, which is when it is at my up most favourite. The weekend after I was set with the task of producing a dessert that encompassed the flavour of summer, but I just couldn't get that Eton Mess out of my mind! And thus, this Millefeuille was born.

I loved this, I won't lie. I would have sat and eat the orange cream with a spoon if I was allowed. Maybe I did.


Summer Fruit Millefeuille

This dessert was based upon a recipe made by Gordon Ramsay and was available on the Channel 4 website but it has since been removed. 

  • 320–375g ready-rolled all-butter puff pastry
  • 3tbsp icing sugar, plus extra to dust
  • 1tsp vanilla extract
  • 600ml double cream
  • Zest of 1 orange
  • ½ tbsp orange juice
  • 200g-300g of fresh raspberries, strawberries, blackberries and red grapes

1) Preheat the oven to 220°C/gas mark 7.

2) Unroll pastry from packaging, roll out slightly and cut into 3 equal strips. Place the strips onto a baking tray lined with greaseproof paper. Cover generously with icing sugar and bake for 8 minutes. Reduce the temperature to 200°C/Gas 6 and cook for a further 8-11 minutes until golden, but be careful! They can burn quickly. Leave to cool on a wire rack.

3) While the pastry is cooling prepare the cream. Add the sugar and vanilla to the cream ans whip until it forms soft peaks, be careful not to over beat. Fold in the orange zest and juice. Fill a piping bag with the cream (I used a large star tip) and chill in the fridge until ready to use.

4) Assemble the dessert just before serving to ensure that the pastry doesn't become soggy. Add a small amount of cream to the serving plate so the dessert does not slip. Place a layer of pastry to the plate. Pipe the cream in small peaks across the entire layer. On the outer edges alternate the raspberries, blackberries and halved strawberries. Dot the grapes along the center of the layer.

5) Take the next layer of pastry and, with a spatula, spread a generous layer of cream along the base of the pastry. Place it on top of the last layer and apply cream and fruit. Repeat with the last layer of pastry.

6) To decorate, sprinkle with icing sugar and curls of orange zest. Choose a large, good looking strawberry and with a sharp knife make slices a few millimeters apart. Gently twist the strawberry and place on top of the millefeuille.  Serve immediately and enjoy!


Friday, 19 October 2012

Three Strand Plaited White Bread

I've never made bread in my life, hell the only time I've ever use yeast was when I made a Stollen for my sisters Christmas present. I suppose it says something about me that the first time I make bread I choose to complicate it further by plaiting it.

Although I am afraid I have caught something of a 'bread bug' since I made this. I've made 2 loaves of plain bread (the recipe is to be posted soon) in a week with plans to make at least 1 loaf a week. I mean why wouldn't I? To bake 6 loaves it adds up to about £2.50! You pay that for 2 bog standard loaves in the supermarket!


Anyway, back on to this bread. I was watching The Great British Bake a while ago (Which I do religiously. I adore that programme. I'm team James!) and they were doing plaited loaves. When I first saw them I cringed and hid behind my pillow, crying 'they looks so hard, oh god, don't ever let me make them'...

Yeah.

They are actually ridiculously simple, although they were doing 6 stranded braids and I did 3. But I looked in to it and they themselves aren't really that difficult. Maybe that can be my next project?


Three Strand Plaited White Bread

675g Strong white bread flour, plus extra for flouring
1 1/2tsp Salt
1 1/2tsp Sugar
3tsp Easy blend yeast
1 1/2tbsp Olive oil, plus extra for greasing
450ml Warm water
1 small egg
optional: a handful of seeds to sprinkle over the top (eg. poppy seed, sesame seeds, pumpkin seeds etc)

1) Stir together the salt and flour, then sprinkle over the sugar and yeast.

2) Add the olive oil to the water. create a well in the middle of the flour mixture and pour in the majority of the water. Set some aside to help you get the right consistency. Stir together until you get a soft dough, you may have to use your hands to get it to mix altogether.

3) Knead the bread on a lightly floured surface for around 10 minutes, until it's smooth and elastic. If you've never made bread before you may be worried about knowing it's 'smooth and elastic'. Don't worry. When you're doing it, you'll know.

4) Place the dough in a large, lightly oiled bowl and cover it with cling film. Leave it in a warm place (for me that's my airing cupboard) for around an hour, until it's doubled in size.

5) Turn the dough out on a very lightly floured surface and knead for 5 minutes, this will 'knock it back', which basically means removing the air.

6) Divide the dough into 3 equal portions (I weighed my dough to get it exact) and roll them into equal sausage shapes. DO NOT flour the surface. You wont get enough friction to roll them out properly.

7) Lay the sausages out and join the ends furthest away from you. Plait like you normally would, keeping the plait tight. When you come to the end squish the sausages together and tuck them underneath.

8) Transfer the loaf carefully onto a lightly floured baking tray. Cover the loaf and return back to a warm place until it's one and a half times it's size. This will take between 10-30 minutes.


9) Preheat the oven 220C/400F/Gas 7

10) Glaze the loaf with beaten egg, making sure to get into all the nooks and crannies. If you want to, sprinkle with seeds.

11) Bake the loaf for 10-15 minutes and the reduce the heat to 190C/375F/Gas 5 and bake for a further 30 minutes. It's done when it's risen, golden and sounds hollow when the bottom of the loaf in tapped. Enjoy!

Until next time,

Katie.

Saturday, 15 September 2012

The Best Fruit Cake Yet

Or so I'm told.

This recipe is from The Good Housekeeping's Cookery Compendium, a book that was published in 1953 and looks every inch it's age. It truly is a beautiful book.

Anyway, this the cake I make when all else fails. When I need to make a cake that gets a wow but only takes me half an hour to knock out.


For those wondering, my sisters and brother-in-laws wedding went spectacularly! I can't tell you how many times I've heard the words 'the best wedding I've ever been to' and 'the wedding of the year'! Congrats guys!

The Effortless Wow Fruit Cake

Ingredients:
225g Butter or Margarine
225g Sugar (whatever you have lying around)
4 Eggs
340g Plain Flour
3/4tsp. Baking Powder
A pinch of salt
1/2tsp. Cinnamon
1/2tsp. Mixed Spice
400g Dried Mixed Fruit
60g Chopped GlacĂ© Cherries
30g Ground Almonds
A splash of Milk

You can double this recipe if you want, but the cooking time then changes to 3 hours.

1) Pre-heat your oven to Gas Mark 4/350F.

2) Grease and line a baking tin. It's up to you what type you use but I usually use either a 8in square tin or a 8 1/2in circle tin.

3) Cream in the butter and the sugar until fluffy, beat in the eggs.

4) Sieve in the flour, baking powder, salt and the spices (This part is up to you, you can change the spices if you wish. I sometimes just add the cinnamon or replace the mixed spice with nutmeg. It depends on the person you're making it for and the time of year). Then add the mixed fruit, cherries and almonds. Fold it all together, adding a little bit of milk if necessary.

5) Pour into the cake tin and put in the oven. After 30 minutes lower the temperature to Gas Mark 2/300F and let bake for 1 - 2 hours. The time varies every time, so keep your eye out. It should be done when firm in the center.

4) Let the cake cool the either cover in marzipan and icing or decorate with cherries, flaked almond and icing sugar. Enjoy.

Until next time,

Katie.

Wednesday, 4 July 2012

Cinnamon Fruit Crumble

I figured that the first recipe I’m going post on here should be the recipe that got me into baking. Though I should probably give you some back story first. On one typical English morning our food teacher assigned us a job. The job was pretty simple, it was to decide what extra ingredient we should add to a basic apple crumble.

For as long as I could remember I have had a love affair with cinnamon, so that was what I immediately picked. It was only recently that I realised that nearly every apple crumble recipe in existence had cinnamon in. Maybe I knew what I was doing after all?

Probably not.

Regardless, I fell in love with baking that day. And I’ve never looked back.

Cinnamon Fruit Crumble

Ingredients:

For the fruit:
500 - 600g (1kg - 1.2kg) Cooking apples (If you end up with not enough apples you can always bulk it up with raisins or blackberry’s or whatever you've got in your house)
50g (100g) Sugar, brown or white it’s to your preference. I usually use brown.
2 tsp (3 1/2 - 4 tsp) Ground cinnamon
2 tbsp (4 tbsp) Water

For the crumble:
150g (300g) Plain flour
50g (100g) Oats (Optional - more often than not I leave these out)
100g (200g) Sugar, again it’s up to you whether you use brown or white. I usually use brown.
100g (200g) Unsalted butter, soften
1 tsp (2 tsp) Ground cinnamon

This recipe usually gives around 2-3 servings. When we have company around I double it (or when I'm feeding both my father and brother-in-law), the amounts given in brackets give around 5-6 servings.

1) Pre-heat oven to Gas Mark 6.

2) Peal and de-core the apples then chop them into bite size pieces. Make sure they’re all around the same size as this will help them cook evenly. Try not to make them too small because when they cook they may turn to mush. If you have to add any additional fruit to get the required weight, do so now. Tip: To keep your apples from going brown, fill a bowl up with cold water and place them in there after chopping. Just make sure to drain them thoroughly afterwards.


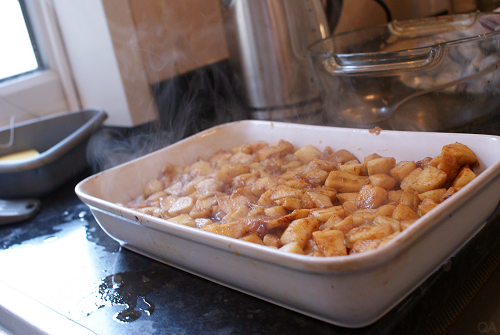
3) Put the chopped apples into a large microwaveable bowl, with the cinnamon, sugar and water. Put them in the microwave for 10 minutes (add an extra minute if you’re doubling the recipe) with a lid. Do not let them boil. If you notice they are, stop the microwave for a moment and then carry on until they have cooked for the full 10 minutes.

4) While the fruit is cooking make the crumble. Add the flour and butter to another bowl and rub between your fingers until they resemble bread crumbs. Yes, this job is messy but stay with it, the end product is worth it.

5) Add the oats, sugar and cinnamon and mix.


6) When the fruit is done and has cooled slightly pour it into a large oven proof dish. Flatten them so they cover the base of the dish.


Then add the crumble on top.


7) Put in the over for around 20 minutes and rewarm before serving.


And ta-da! First recipe complete! I hope you like it, feedback is always welcome :). Thank you for reading!

Until next time,

Katie.

Tuesday, 3 July 2012

I've got a long way to go, but I'm still learning...

Good evening all! And welcome to the very first post on my brand new blog. My name is Katie and I am a passionate baker, photographer and all rounder crafter. I am, perhaps, not the best at any of those things, but I aim to be. This blog is going to be a place where I write about the things I've made, the lessons I've learned and the progression I've made.

My hope is that in, say 6 months time, I'll be able to look back and see how much I've improved. And I want to take you along on that journey, showing you all the new tips and tricks I've found. I've always strived to be the best I can, so why not share that with you?

So here we go, this is the first step into the unknown! I hope you enjoy the journey.

Until next time,

Katie.